Diskless Server: Network Booting and Configuration
When your work is related to DevOps and clouds is nice to have your own k8s cluster to play with. You can do experiments with it, test ideas and learn how to deal with this monster:) I finally found a menthal, an time resource to build one. My goal here is create reproducible k8s node setup that can be booted over the network, and try to do that without system storage, in a diskless mode. This approach allows to experiment with resource-constrained hardware while applying Infrastructure as a code (IaaC) practices. Here I have focused more on node booting, creation, and configuration, rather than building and configuring Kubernetes itself.
Goal
- Create a server which is configures on booting
- Make reproducible setup
- Use IaaC approach (Continue Ignore Ansible xD)
- Have fun
Hardware
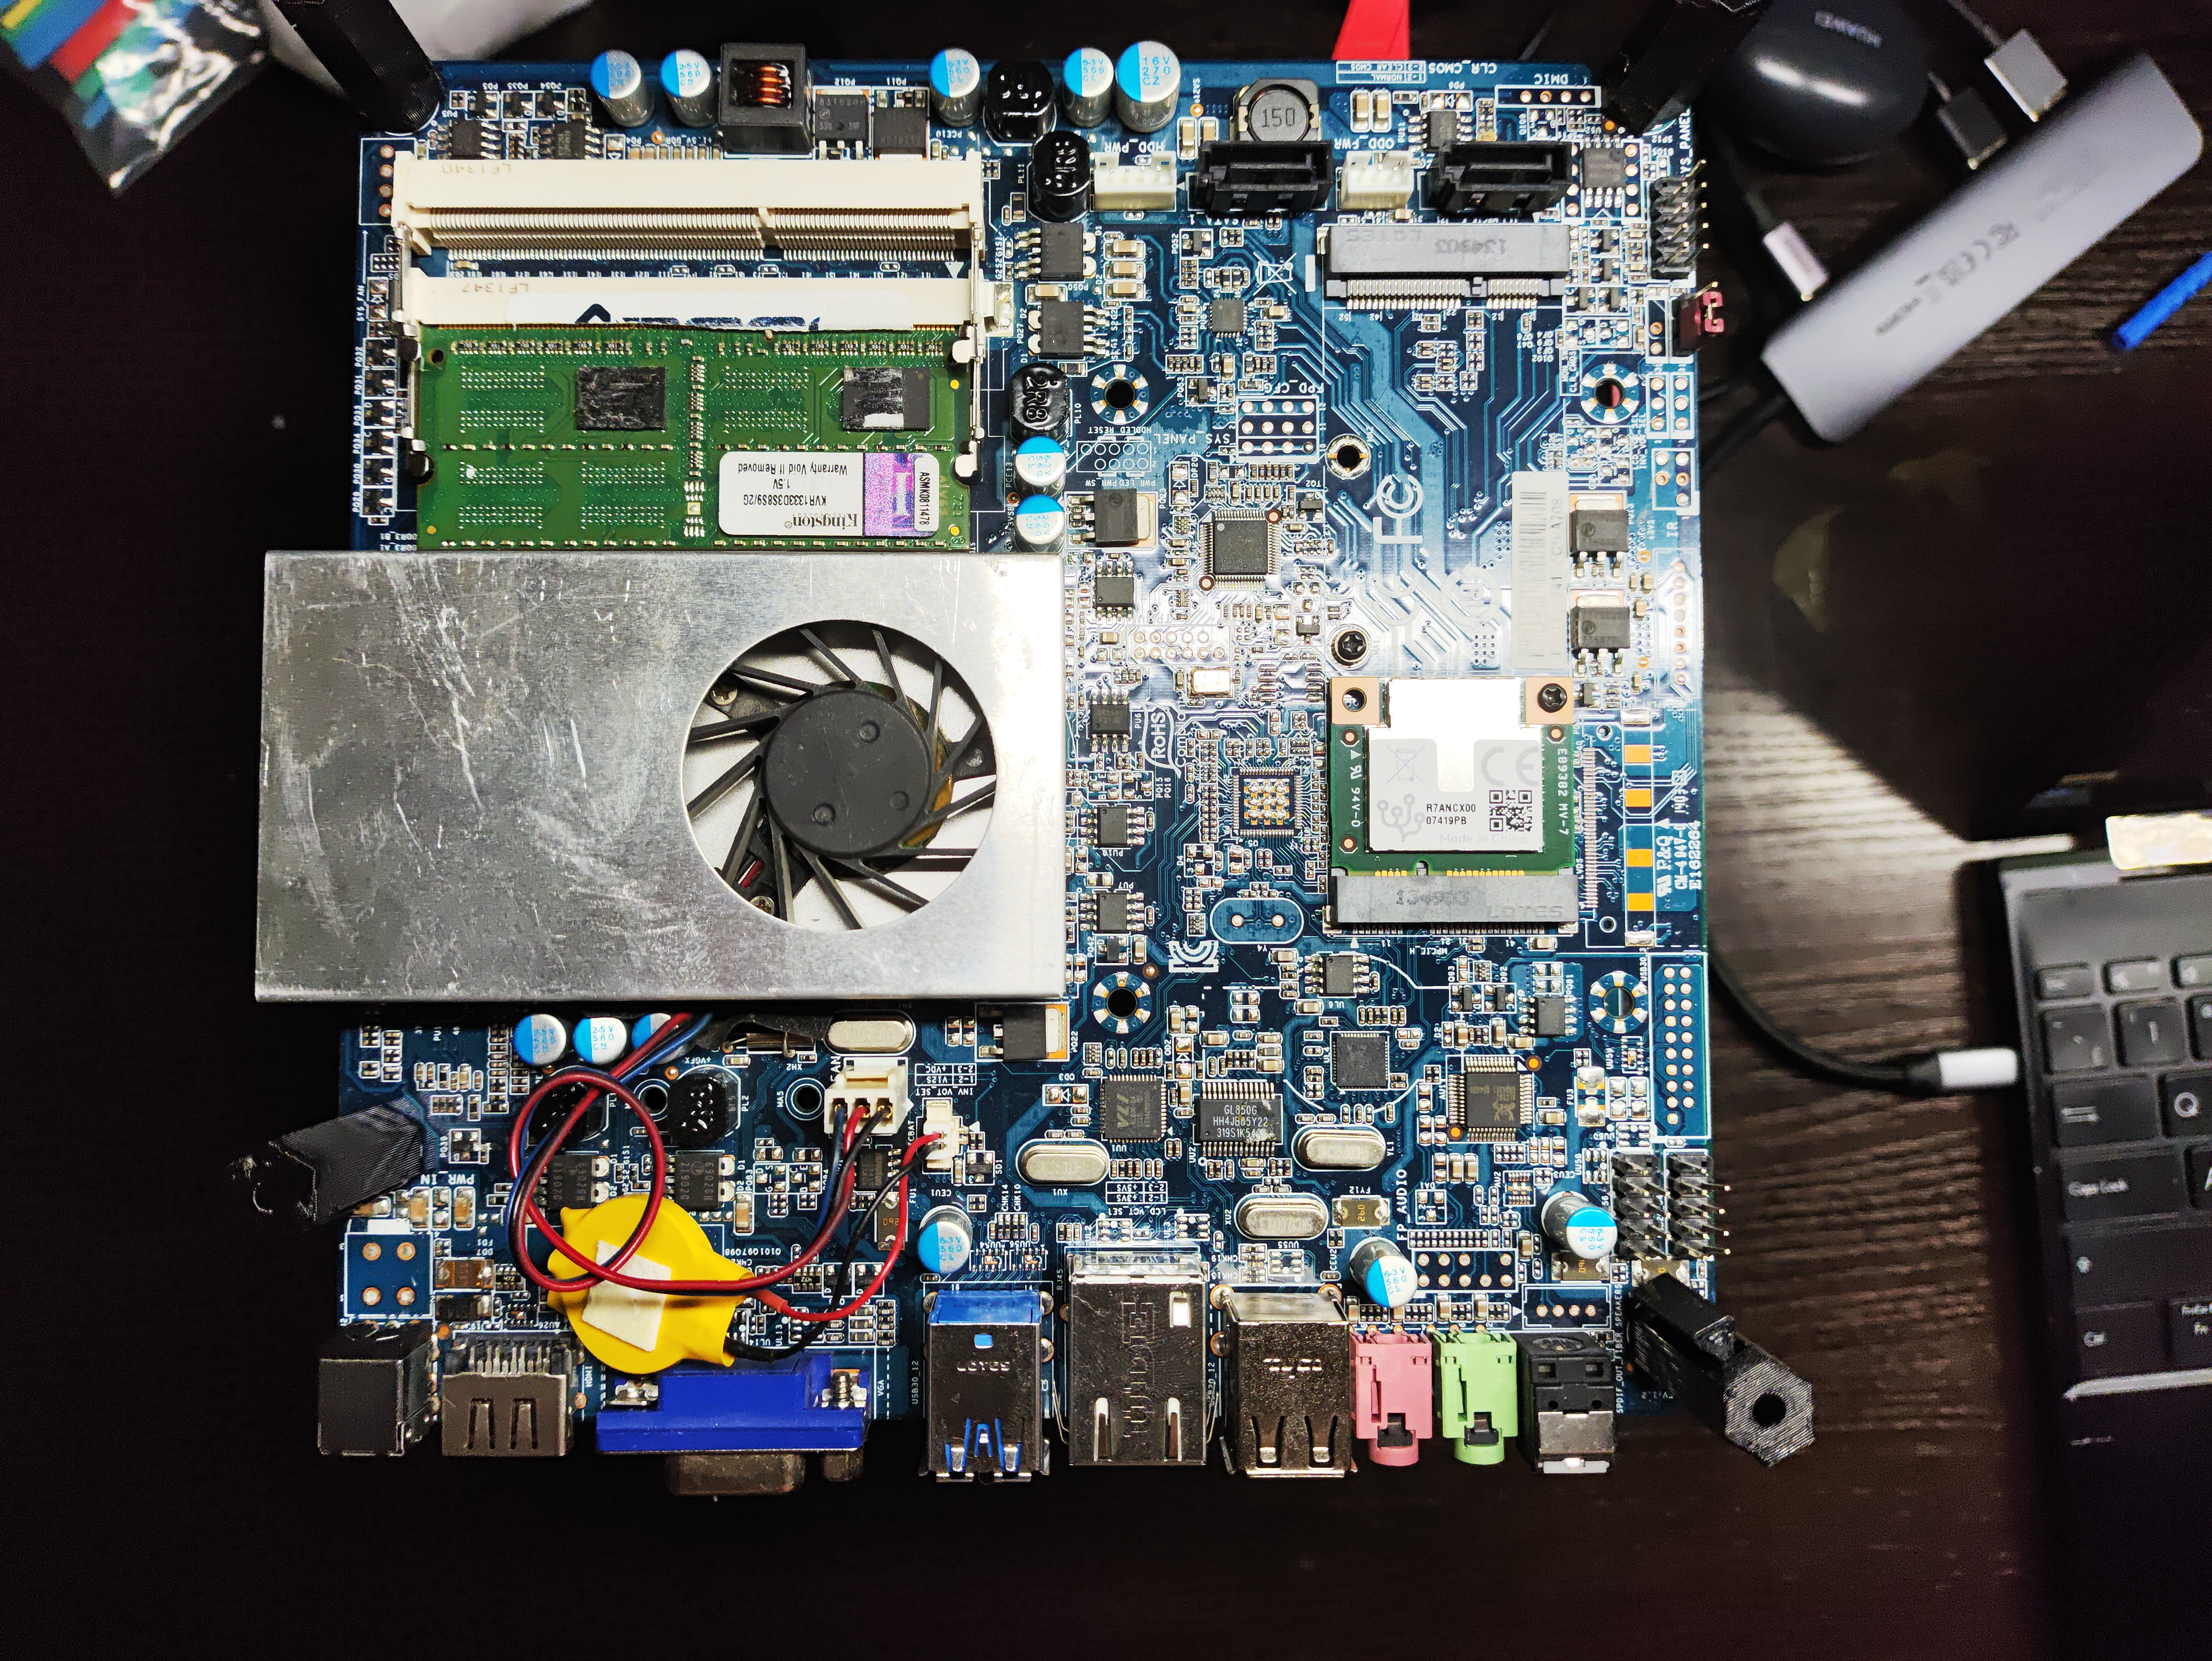
A friend of mine found several used, retired motherboards. And he let me play with it. So I have 7 MiniITX motherboards Q3-TJ1900 there is it's specification:
- Processor – Intel Celeron J1900 (Qaud core) with integrated HD graphics
- System Memory – 2x SO-DIMM Slots for DDR3&DDR3L 1333MHz up to 16 GB (but I only have 10 2 Gb sticks)
- Storage – 2 x SATA 3Gb/s (SATAII) Ports (May be will use it later, for a persistent storage)
- Power P12V/19V Power Port - it is very convenient to have just notebook power adapter insead of bulky PC's power source.
- HDMI - easy to configure BIOS
- 1 Gigabit LAN
- Mini PCIExpress - could be used for a wifi module or another PCI devices.
More specs here
For a network switch I have, 12 port managed PoE switch, used one of course.
Network Setup
Here is a network setup which I'm using for this project. I have
- workstation - is an Arch LInux machine with a docker installed. This one will be used as main server to host required services.
- network switch - Extreme network 24 port managed switch.
- nodes - are hosts which I'm trying to boot and use as a k8s cluster.
- router - my local network router connected to Internet Service Provider.
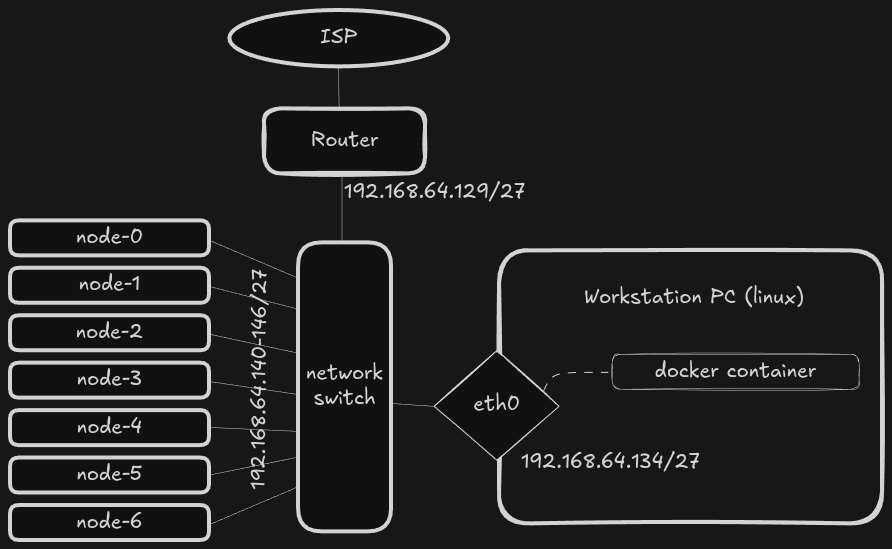
For my cluster setup I use dedicated 192.168.64.128/27 sub net. There is enough room to add new devices and services. 192.168.64.129 is my router. It is also works as a DNS service in local network.
Constraints
Since I have only motherboards without any storage I have decided to try diskless setup. Entire OS will be copied to RAM and run from it, this can be beneficial in terms of performance. But downside of this is limit of available storage and memory.
Also I want to have a reproducible setup, so I could easy to run same setup on another node, and it would be the same. That's why I have to use some configuration management.
Initially, I attempted to install Artix Linux, my preferred distribution due to its simplicity and systemd-free environment. However, the default installation consumed more than 2GB of RAM, exceeding the thin clients’ capacity. Even after attempting to slim down the installation, it remained too heavy for the hardware.
I decided to another OS: Alpine Linux. I was using it before, but only for a
small docker containers. Alpine Linux appeared to be a good choice due to its
minimalistic design and ability to run in diskless mode. The entire operating
system loads into RAM using tmpfs, allowing the system to function without any
local storage. After booting, the base system uses approximately 100MB of RAM,
leaving enough memory for running applications and Kubernetes components. It
have a good wiki-style documentation, it uses busybox set of core utilities,
musl as the standard library, OpenRC for init system. All of this means it
uses much less space on the disk and much less space in memory.
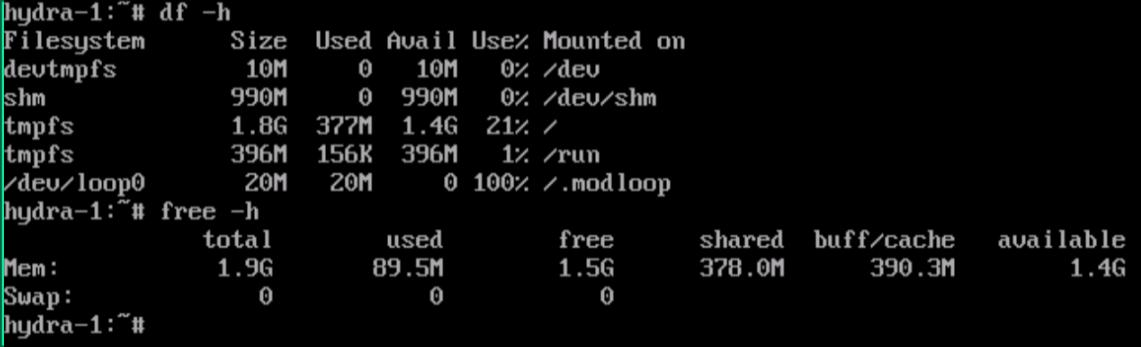
Below is a picture where I have booted Alpine Linux in diskless mode, in
virtual environment and install k3s with all required dependencies and it
consumed only 90 Mb of memory for the running system and 380 Mb for the storage
(tmpfs). So approximately 1.5 GB still available for usage.
Network Boot
I found that my JQ1900 can be booted using PXE by exploring BIOS/UEFI config options.
Then I have to figure out how to run PXE server to boot machine. I found a
pixiecore
utility. It have pretty good
explanation
how PXE works in details. Here we have to know that pixiecore does most of the
tedious work for you. It receives DHCPDISCOVER from the computer which tries to
boot from the network. DHCP server provides for it network configuration, but
pixiecore provides boot configuration, which consists of kernel and
initramfs. Optionally you also can provide kernel command line parameters and
boot message.
pixiecore boot --dhcp-no-bind vmlinuz-lts initramfs-lts --cmdline 'ip=dhcp console=ttyS0 quiet alpine_repo=https://dl-cdn.alpinelinux.org/alpine/v3.21/main modloop=http://192.168.64.134:8080/modloop-lts'
here boot is pixiecore's mode which uses provided kernel and initramfs to boot systems.
- --dhcp-no-bind - allow not to bind DHCP port (since there is a real DHCP server working), but intercept DHCP requests anyway.
-
vmlinuz-lts initramfs-lts - are kernel and initramfs to boot with
-
--cmdline - are command line to boot system with here I've provided
- console=ttyS0 - to see booting process in the attached monitor
- ip=dhcp - to obtain IP address during early init using DHCP.
- quiet - less log output
- alpine_repo - which alpine repository to use to obtain initial packages.
- modloop - URL to resource where modloop for current kernel is located. Here
192.168.64.134 is my workstation's IP with
miniserverunning on port 8080.
Alpine Linux out of the box supports diskless
mode. At this mode entire
operating system including all binaries and libraries are loaded into RAM
(tmpfs). There is no persistence, so each time all packages are installed from
scratch. To make maintenance easier, there is Local Backup
Utility. It keeps all
configuration files and list of installed packages in a tar.gz archive. So you
can prepare you system, then save configuration, then provide apkovl to init
script parameter via kernel parameter, when boot next time, and it will install
packages and restore configuration.
To get Alpine Linux's kernel and initramfs you can use official netboot
packages. Here is example for alpine version
v.3.21.
There is files you need:
-
vmlinuz-lts - this is a kernel, you can use vmlinuz-virt to boot if you are trying to boot it from virtual environment like
LibVirt, orVirtual-Box. -
initramfs-lts - this is an initram it contains bare minimum to run linux, minimal set of utils, and init script wich will rollup the system.
- modloop-lts - this is a set of kernel dynamic modules which will be mounted on late boot, to be used during regular work. Since my system will not be installed in traditional way, it requires to mount modloop to be able to use kernel modules.
Note: It is important to use those versions of initram and modloop same as
the kernel: lts for vmlinux-lts, and virt for a virt type of kernel.
Also you can use tar.gz-archived packages to make your download verifiable, with signatures and hash-sums.
Now you have downloaded all required files, for example into project-boot
directory alpine-v3.21:
❯ ls alpine-v3.21
config-6.12.13-0-lts
config-6.12.13-0-virt
dtbs-lts
dtbs-virt
initramfs-lts
initramfs-virt
modloop-virt
System.map-6.12.13-0-lts
System.map-6.12.13-0-virt
vmlinuz-lts
vmlinuz-virt
To make things easy to repeat, I've decided to run all required services in a docker containers. It is possible use podman instead of docker, but services like DHCP and DNS requires to run on default ports and require network capabilities to be easy discovered with default client settings, so podman need to be running as root, or have additional privileges.
Run Pixecore In Container
Here is example how to run pixiecore as a docker container, using docker-compose:
services:
  #...
  pixiecore:
    image: docker.io/pnnlmiscscripts/pixiecore:latest
    volumes:
      - ./alpine-v3.21/:/srv:ro
    network_mode: host
    environment:
      WEBSERVER_IP: 192.168.64.134
    command: boot /srv/vmlinuz-lts /srv/initramfs-lts --debug --dhcp-no-bind --cmdline 'console=ttyS0 console=tty0 console=AMA0 video=mxcfb0:dev=hdmi,1920x1080@60,if=RGB24 ip=dhcp ds=nocloud;s=http://${WEBSERVER_IP}:8080/agent alpine_repo=https://dl-cdn.alpinelinux.org/alpine/edge/main,https://dl-cdn.alpinelinux.org/alpine/edge/community modloop=http://${WEBSERVER_IP}:8080/modloop-lts'
The alpine-v3.21 directory contains kernel vmlinuz-lts and initramfs-lts.
It is mounted to a container's /srv/ directory. And it is also reqires to run
on system port, and provides service to real-network devices attached to the
host machine so network mode host is used. command specifyes arguments to the
pixiecore utility, here I've added additional parameters:
- --debug - show more logs
-
--cmdline - commandline to the kernel, here all init setup happends:
-
console=ttyS0 console=tty0 console=AMA0 - use all of the available consoles to output.
-
video=mxcfb0:dev=hdmi,1920x1080@60,if=RGB24 - configure video output (optional to debug booting with Video display)
- modloop - source of the modules for the kernel, here I've used environment variable WEBSERVER_IP which points to
miniservewebserver. - ds=nocloud;s=http://${WEBSERVER_IP}:8080/agent - DS here is for DataSource in my case is Nocloud; s - stands for the "Seed from" which is my
miniservewebserver URL which serves fileuser-data, andmeta-data. - init_debug - (option) setup shell debug
-xflag at initram init script, so it is easyer to debug early boot process. -
alpine_repo - here It is changed from version
v3.21toedgeto get access to the community's packages such as k3s (which is light-weight version of Kubernetes). -
${WEBSERVER_IP} is a environment varialbe which is contains host's IP address. Since it uses in multiple places it is much easyer to change in one place.
But there is a problem appeared: I have to manually restart pixiecore
service with a different cmdlinne parameter for each node. I can fix it by using API mode for a pixiecore and adding backend service which will serve individual boot config for each node. But I'll make another post about it. For now I just test the boot process and node configuration itself.
DHCP Server
Regardless name dnsmasq works not only as a DNS but also as DHCP server as
well. It provides IP addresses for a booting systems, so they could download
required components, from the network, and boot. This role could play your
router, or in my case it is a dnsmasq running on my workstation. Below is a
part of docker-compose file which describes services I want to run:
services:
  # ...
  dnsmasq:
    image: docker.io/dockurr/dnsmasq:latest
    container_name: dnsmasq
    network_mode: host
    environment:
      DNS1: "192.168.64.129"
    cap_add:
      - NET_ADMIN
    restart: always
    volumes:
      - ./dnsmasq.conf:/etc/dnsmasq.conf
Here I use latest image of dockurr/dnsmasq, it configured to use my local DNS
resolver/forwarder with address 192.168.64.129. Additional network
capabilities NET_ADMIN, is required since it perform network-related
operations. To run it using host's network I have set network_mode: host,
since it provides services for a real network devices, available via host's
network interface. The rest of the configuration parameters are in
dnsmasq.conf which is mounted to the container as volume to
/etc/dnsmasq.conf:
# disable DNS functionality by using port=0
port=0

# Specify the interface to listen on. Replace 'eth0' with your actual interface.
interface=eth0

log-queries # show DNS requests in the logs

# DHCP range for dynamic IP allocation.
# Example: from 192.168.1.50 to 192.168.1.150, with a 12-hour lease time.
dhcp-range=192.168.64.140,192.168.64.147,12h

# Specify a fixed IP address for a specific MAC address
# Replace 'XX:XX:XX:XX:XX:XX' with the target MAC address and
# '192.168.1.10' with the desired static IP.

# All IP addresses are predefined for each node here
# to be shure which hosts are up by ICMP (ping) requests
dhcp-host=a0:1a:2c:c3:d4:e0,192.168.64.140 # node-0
dhcp-host=a0:1a:2c:c3:d4:e1,192.168.64.141 # node-1
dhcp-host=a0:1a:2c:c3:d4:e2,192.168.64.142 # node-2
dhcp-host=a0:1a:2c:c3:d4:e3,192.168.64.143 # node-3
dhcp-host=a0:1a:2c:c3:d4:e4,192.168.64.144 # node-4
dhcp-host=a0:1a:2c:c3:d4:e5,192.168.64.145 # node-5
dhcp-host=a0:1a:2c:c3:d4:e6,192.168.64.146 # node-6

# Optionally, set default gateway and DNS server IPs to be handed out
# Replace '192.168.1.1' with your router's IP address.
dhcp-option=option:router,192.168.64.129
dhcp-option=option:dns-server,192.168.64.134,192.168.64.129
Webserver Configuration
The Webserver distributes the necessary files over the netwotk for a booting systems. These files are:
- modloop
- tiny-cloud configuration files (user-data,meta-data, etc.)
- apkovl (optional apk overlay)
To serve different system configurations to the master and worker nodes, I crated different user-data, and meta-data files, and put them into a separate directories.
services:
  # ...
  webserver:
    image: docker.io/svenstaro/miniserve:latest
    volumes:
      - ./webserver/:/srv:ro
    network_mode: host
    # expose:
    #   - 8080:8080
    command:
      - --verbose
      - /srv
Here:
webserver- folder contains all shared files and folders. and it is mounted to /srv container's directory with ReadOnly mode, to not owerwrite files by uploading new one.hetwork_mode: host- to use real host's interface 8080. Also you can do here port expose, since it works on TCP level it could be proxied by docker.
Resulting Docker Compose File
---
services:
  webserver:
    image: docker.io/svenstaro/miniserve:latest
    volumes:
      - ./alpine-v3.21/:/srv:ro
    network_mode: host
    command:
      - --verbose
      - /srv

  pixiecore:
    image: docker.io/pnnlmiscscripts/pixiecore:latest
    volumes:
      - ./alpine-v3.21/:/srv:ro
    network_mode: host
    command: boot /srv/vmlinuz-lts /srv/initramfs-lts --debug --dhcp-no-bind --cmdline 'console=ttyS0  ip=dhcp alpine_repo=https://dl-cdn.alpinelinux.org/alpine/edge/main,https://dl-cdn.alpinelinux.org/alpine/edge/community modloop=http://192.168.64.134:8080/modloop-lts'

  dnsmasq:
    image: docker.io/dockurr/dnsmasq
    container_name: dnsmasq
    network_mode: host
    environment:
      DNS1: "192.168.64.129"
    cap_add:
      - NET_ADMIN
    restart: always
    volumes:
      - ./dnsmasq.conf:/etc/dnsmasq.conf
Let's run it:
❯ docker-compose up
[+] Running 3/3
 ✔ Container dnsmasq              Created                                           0.0s
 ✔ Container net-lab-pixiecore-1  Created                                           0.0s
 ✔ Container net-lab-webserver-1  Created                                           0.0s
Attaching to dnsmasq, pixiecore-1, webserver-1
dnsmasq      | dnsmasq: started, version 2.91 cachesize 150
dnsmasq      | dnsmasq: compile time options: IPv6 GNU-getopt no-DBus no-UBus no-i18n no-IDN DHCP DHCPv6 no-Lua TFTP no-conntrack ipset no-nftset auth DNSSEC loop-detect inotify dumpfile
dnsmasq      | dnsmasq: warning: ignoring resolv-file flag because no-resolv is set
dnsmasq      | dnsmasq: warning: no upstream servers configured
dnsmasq      | dnsmasq-dhcp: DHCP, IP range 192.168.64.140 -- 192.168.64.147, lease time 12h
dnsmasq      | dnsmasq: cleared cache
pixiecore-1  | [Init] Starting Pixiecore goroutines
webserver-1  | miniserve v0.29.0
webserver-1  | Sat, 14 Jun 2025 14:39:55 +0000 [INFO] starting 16 workers
webserver-1  | Bound to [::]:8080, 0.0.0.0:8080
webserver-1  | Serving path /srv
webserver-1  | Available at (non-exhaustive list):
webserver-1  |     http://127.0.0.1:8080
webserver-1  |     http://192.168.64.134:8080
webserver-1  |     http://[::1]:8080
webserver-1  |
webserver-1  | Sat, 14 Jun 2025 14:39:55 +0000 [INFO] Actix runtime found; starting in Actix runtime
webserver-1  | Sat, 14 Jun 2025 14:39:55 +0000 [INFO] starting service: "actix-web-service-[::]:8080", workers: 16, listening on: [::]:8080
webserver-1  | Sat, 14 Jun 2025 14:39:55 +0000 [INFO] starting service: "actix-web-service-0.0.0.0:8080", workers: 16, listening on: 0.0.0.0:8080
# Now I plug power into the node
# And it request IP address, and dnsmasq-dhcp replyes
dnsmasq      | dnsmasq-dhcp: DHCPDISCOVER(enp4s0f4u1u3) 34:1a:4c:10:a7:08
dnsmasq      | dnsmasq-dhcp: DHCPOFFER(enp4s0f4u1u3) 192.168.64.140 34:1a:4c:10:a7:08
# pixiecore also see DHCP request and replies with ab boot offering:
pixiecore-1  | [DHCP] Got valid request to boot 34:1a:4c:10:a7:08 (X64)
pixiecore-1  | [DHCP] Offering to boot 34:1a:4c:10:a7:08
dnsmasq      | dnsmasq-dhcp: DHCPREQUEST(enp4s0f4u1u3) 192.168.64.140 34:1a:4c:10:a7:08
dnsmasq      | dnsmasq-dhcp: DHCPACK(enp4s0f4u1u3) 192.168.64.140 34:1a:4c:10:a7:08
...
# Here pixiecore sends kernel and initramfs files:
pixiecore-1  | [HTTP] Sent file "kernel" to 192.168.64.140:43380
pixiecore-1  | [HTTP] Sent file "initrd-0" to 192.168.64.140:43380
...
After a wile system up and running, but you can only use it with a monitor, and keyboard, since there is no ssh-server running or any service, it is fresh and bare minimal.
Alpine Linux Configuration
Now we have a system which can be booted via network. Next step is to configure it. But we have to use IaaC approach, so it is restricted to do it manually. We have to use some configuration management tool.
Alpine Linux already have a tooling which can be useful: apkovls - APK
Overlay. It is just an archive with configuration files and list of installed
packages. So you could do things manually once, make backup with lbu commit
command. It will make an tar.gz archive. Then reuse this on another system.
apkovl could be a file on the local storage (not in my case, I would like to
try to keep it truly diskless, no HDD/SSD or usb drives), or it could be loaded
from remote webserver, during a boot process.
But apkovl makes system identical, to one that was backed-up, so there will
be the same hostnames, same network and services configurations. It doesn't quiet
suit our needs, since we need different hostnames, and different configurations
for a master and worker nodes. Also when you have just an
my-node.apkovl.tar.gz it is not clear what packages it have, what
configuration files and it's components can't be resused. Let's look for a
something else...
I found another approach to configure OS at boot time: cloud-init. It configures at the boot time by, using cloud-init yaml file which describes desired state. It works at init boot stage, and seems to work for my case. For Alpine Linux there is compact alternative to cloud-init: tiny-cloud. It have much less dependencies and much smaller memory footprint. But it is limited in available configuration modules. Main advantage over apkovl for me is readability of the configuration, since config is just a yaml file, it can be stored in a git and be versioned, and you can keep different versions for a different node-types (k8s master, and worker nodes).
Let's dive in and try to boot Alpine Linux with tiny-cloud...
Tiny-Cloud Boot
There is not match information about booting Alpine Linux with tiny-cloud. Only a kernel parameter ds= which is similar to
coud-init's parameter. To get more information I've install mkinitfs package.
apk update
apk add mkinitfs
This package used to make custom initramfs for your boot process. For example if
you want to have encrypted storage, you have to have custom initramfs which
decrypt your root fs before boot into it. This package contains default init
script /usr/share/mkinitfs/initramfs-init, which runs on early boot stage.
There I found information related to booting with tiny-cloud:
...
want_tiny_cloud() {
        if [ -f "$sysroot/etc/tiny-cloud.disabled" ]; then
                return 1
        fi
        if [ -n "$KOPT_ds" ] || [ "$KOPT_tinycloud" ]; then
                return 0
        fi
        if grep -q "^ds=" "$ROOT"/sys/class/dmi/id/product_serial 2>/dev/null; then
                return 0
        fi
        findfs LABEL=cidata >/dev/null 2>&1 || findfs LABEL=CIDATA >/dev/null 2>&1
}
# ...
if [ -z "$KOPT_apkovl" ]; then
        # Not manually set, use the apkovl found by nlplug
        if [ -e "$ROOT"/tmp/apkovls ]; then
                ovl=$(head -n 1 "$ROOT"/tmp/apkovls)
        fi
    elif is_url "$KOPT_apkovl"; then
            # Fetch apkovl via network
            MACHINE_UUID=$(cat "$ROOT"/sys/class/dmi/id/product_uuid 2>/dev/null)
            url="$(echo "$KOPT_apkovl" | sed -e "s/{MAC}/$MAC_ADDRESS/" -e "s/{UUID}/$MACHINE_UUID/")"
            ovl="/tmp/${url##*/}"
            ovl="${ovl%%\?*}"
            $MOCK wget -O "$ovl" "$url" || ovl=
    else
            ovl="$KOPT_apkovl"
    fi
# ...
if [ -f "$sysroot/etc/.default_boot_services" -o ! -f "$ovl" ]; then
        # add some boot services by default
        rc_add devfs sysinit
        # ...

        if want_tiny_cloud; then
                pkgs="$pkgs tiny-cloud ifupdown-ng doas"
                rc_add tiny-cloud-boot boot
                rc_add tiny-cloud-early default
                rc_add tiny-cloud-main default
                rc_add tiny-cloud-final default
        fi
        # ...
fi
#...

if [ -n "$ovlfiles" ]; then
        apk add --root $sysroot $repo_opt $apkflags $pkgs <$ovlfiles
else
        apk add --root $sysroot $repo_opt $apkflags $pkgs
fi
Translating from shell to human: during init script it checks whether kernel cmdline
have apkovl parameter. If there is no one it will check whether there it want to
boot with tiny-cloud by looking at kernel cmdline parameter ds= or tinycloud.
If there is one, it adds tiny-cloud package to the list of packages which will
be installed during the boot process. This means: to boot using tiny-cloud we
MUST do NOT specify apkovl and DO add ds= parameter to command line.
How Tiny-Cloud works
Tiny-Cloud works on running system on boot and default runlevels.
On boot it sets default network configuration, enables sshd service (but not
start it yet). On default runlevel it have three "phases":
-
early - here it retrieves
user-data, and stores it locally. -
main - when networking, IMDS, and User-Data are all available, this is the phase takes care of the majority of bootstrapping actions that require them -- setting up the instance hostname, creating default cloud user, and installing SSH keys for it. Additional main phase actions may be taken if there is a User-Data handler defined for its content type, and those actions are associated with the main phase.
- final - The very last thing to be run in the default runlevel. Here are user-data scripts or some specifying user-data handlers, will be running.
To understand where get user-data files tiny-cloud also looks in a kernel cmdline parameters. There we defined ds (which stands for a DataSource). According cloud-init specification (which tiny-cloud relies on) you have to provide following information:
ds=
nocloud. Tiny-cloud also supports this datasource provider.
- user-data
- meta-data
- vendor-data
- network-config
Tiny-Cloud Configuration
Tiny-Cloud uses user-data file for a system configuration. It could have several formats:
- alpine-config
- cloud-config
- script
But you could use only ONE of them.
alpine-configprovides alpine-specific configuration parameters, to configure apk and autoinstall OS to the disk. User-data file MUST have#alpine-configstring at the beginning of the file.-
scriptcould be used to run arbitrary shell script at system init in final-phace. User-data file MUST have script executor shebang, for example#!/bin/shfor a shell. -
cloud-configprovides more parameters to be configured on the system. Those parameters suppose to be compatible with cloud-init modules but currently support only subset of essential modules. User-data file MUST have#cloud-configat the beginning. Here is available subset of the supported parameters (modules):
#cloud-config
user: # <map> sets default user
  name: # <string>

groups: # <list> groups for default user
  - wheel
  - admin

users: # <list>
  # first one become default user
  - name:
    homedir:
    shell:
    primary_group:
    gecos: # description for the user
    system: # [ true | false ] create a system user
    no_create_home: # [ true | false ] do not create home directory for the user. Default: false
    lock_passwd: # reset password of the user
    ssh_authorized_keys: # <list>
    groups: wheel,power # comma-separated list of groups for the user
    doas: # content of the /etc/doas.d/<name>.conf doas file
      -

ssh_authorized_keys: # public key to be authorized as default user

write_files: # <list> Writes content of the file to the system. Can be used to define configuration files.
  - path: # destination path of the file (required)
    permissions: # file mode (default 0644)
    owner: # owner:group of the file (default root:root)
    encoding: # provided endoding of the file [gzip|gz|gz+base64|gzip+base64|gz+b64|gzip+b64|base64|b64|text/plain] (default text/plain)
    append: # if "true", then content will be added to the end of the file
    content: | # (required)
      here is multiline
      content of your file

packages: # <list>
  - curl
  - bash
Other file wich is used for a configuration is meta-data. It can contain following lines:
hostname: my-server.example.net
local-hostname: my-server
ssh-keys: ssh-public-key-to-put-on-remote-system-to-default-user-to-be-able-to-login-using-keys.
I suppse all those paramters are self-described enough.
Tiny-Cloud Boot Setup
Let's recap what we have to download to the booting machine:
- kernel
- initramfs
- modloop
- user-data
- meta-data
- ~vendor-data~
- ~network-config~
Handlers for last two thigs are not curently implemented in tiny-cloud, but it still downloads and saves it.
When kernel and initramfs will be served by pixiecore, rest of the files will be served by miniserve. It is easy to use and it is written with Rust, which is cool.
Here is proposed directory organization for miniserve:
srv
├── alpine-3.21         # contains current kernel, initramfs and modloop
│   ├── initramfs-lts
│   ├── initramfs-virt
│   ├── modloop-lts
│   ├── modloop-virt
│   ├── vmlinuz-lts
│   └── vmlinuz-virt
├── k3s-server          # contains tiny-cloud config files for k8s master node
│   ├── meta-data
│   ├── network-config
│   ├── user-data
│   └── vendor-data
├── k3s-agent-1         # contains tiny-cloud config files for k8s worker node 1
│   ├── meta-data
│   ├── network-config
│   ├── user-data
│   └── vendor-data
└── k3s-agent-2         # contains tiny-cloud config files for k8s worker node 2
    ├── meta-data
    ├── network-config
    ├── user-data
    └── vendor-data
It is not convinient, that we have to create unique set of the each host. There is a way to make it more elegant, by using API mode of pixiecore. But for now I just live it like that, since it requires custom backend web-service.
How resulted boot process should be like:
- BIOS (UEFI) initialize and tries to boot using PXE.
- UEFI uses DHCP to obtain address and boot parameters.
dnsmasqprovides IP address but not booting configpixiecorecatches boot DHCP request and sends to the system kernel, initramfs, and command line parameters.- UEFI starts kernel with initramfs with parameters.
- Kernel starts init script from initramfs.
- Init script parses kernel parameters to obtain parameters for itself and checks it for booting using tiny-cloud.
- Init script obtains IP address, downloads and installs tiny-cloud.
- Init script makes chroot into new-root (which is tmpfs)
Init system (OpenRC) start
bootrunlevel, wheretiny-cloud-boottakes it step. (Not required here???) - At
defaultrunlevel several stages of tiny cloud are started:tiny-cloud-earlyobtains configuration files: user-data, meta_data, vendor_data, and network_config fromminiserveand saves it. (vendor_data and network_config saves but not actually uses yet)tiny-cloud-mainconfigures most of the system according user-data: sets hostname, ssh keys, install packages, add users. Here we will set hostname of the node, setup admin users, install required packages, and add configuration files.tiny-cloud-finalruns those parameters which have to be run the latest after users configuration and package installation. (userdata_runcmd) Here we start our k8s services.
Resulting Docker Compose Setup
Here is a all services from above, combined into one docker-compose.yaml flle.
services:
  webserver:
    image: docker.io/svenstaro/miniserve:latest
    volumes:
      - ./webserver/:/srv:ro
    network_mode: host
    command:
      - --verbose
      - /srv

  pixiecore:
    image: docker.io/pnnlmiscscripts/pixiecore:latest
    volumes:
      - ./boot/:/srv:ro
    network_mode: host
    command: boot /srv/vmlinuz-lts /srv/initramfs-lts --debug --dhcp-no-bind --cmdline 'console=ttyS0 console=tty0 console=AMA0 video=mxcfb0:dev=hdmi,1920x1080@60,if=RGB24 ip=dhcp is=nocloud;s=http://${WEBSERVER_IP}:8080/agent alpine_repo=https://dl-cdn.alpinelinux.org/alpine/edge/main,https://dl-cdn.alpinelinux.org/alpine/edge/community apkovl=http://${WEBSERVER_IP}:8080/tc-is-mode-doas.apkovl.tar.gz modloop=http://${WEBSERVER_IP}:8080/modloop-lts'

  dnsmasq:
    image: docker.io/dockurr/dnsmasq
    container_name: dnsmasq
    network_mode: host
    environment:
      DNS1: "192.168.64.129"
    cap_add:
      - NET_ADMIN
    restart: always
    volumes:
      - ./dnsmasq.conf:/etc/dnsmasq.conf
For a basic server setup it is required to have:
- Hostname
- User which could access system via SSH
- SSH access
- Time configuration
- k8s (k3s) configuration
Here is example user-data file of my configuration for a master k8s node:
#cloud-config

users:
  # add local user `sval`
  - name: sval
    groups: sval,wheel
    doas:
      # doas file is tiny alternative for a sudo command
      # Here it's a configuration which allows users in wheel group to use doas
      - permit persist :wheel
    ssh_authorized_keys:
      # Allow authentification using public ssh key
      - ssh-ed25519 AAAAC3NzaC1lZDI1NTE5AAAAIHSSjQs2LdmCeiYPX7LcFCfe7liScJ3jc4u4NAiBZCMw Personal SSH key

packages:
  - curl
  - k3s
  - k3s-openrc

ntp:
  enabled: yes # checks for [ yes | true ]. Otherwise do not enables ntp service
  ntp_client: ntpd # [ ntpd | chrony | openntpd ] (default: chrony)

write_files:
  - path: /etc/ntp.conf # Network Time Protocol daemon configuration
    content: |
      server 0.arch.pool.ntp.org
      server 1.arch.pool.ntp.org
      server 2.arch.pool.ntp.org
      server 3.arch.pool.ntp.org
      restrict default kod limited nomodify nopeer noquery notrap
      restrict 127.0.0.1

  - path: /etc/conf.d/k3s # K3s OpenRC configuration file
    # Here K3S_EXEC specifies k3s parameters with which it will start k3s daemon
    # It is a "server" for a master node
    content: |
      export PATH="/usr/libexec/cni/:$PATH"
      K3S_EXEC="server" # for a worker here should be "agent"

  - path: /etc/rancher/k3s/config.yaml
    # Here is k3s configuration file. For a basic setup it contains only token
    # which will be used for all nodes to join the cluster
    content: |
      token: "myhelloworldtoken"

runcmd:
  # here you can specify arbitrary shell commands which will be run at the final init phase
  # after all packages installed and users configured
  - setup-timezone -z Europe/Moscow
  # Here is a hacky way to setup password for a user `sval`
  # chpasswd accespts "user:passwd_hash" from stdin
  # password hash you could obtain using `openssl passwd` command for example:
  # `openssl passwd -6 -salt foosalt foopass`
  - echo 'sval:$5$ZEnE80baFla37cEN$6g8gkV8pRTXBlRubAyrWuWRgQsUGeuXB9ElC7eaUAI3'  | chpasswd -e
  # enshure all daemons that k3s requires are started and then start k3s itself
  - rc-service dbus start
  - rc-service cgroups start
  - rc-service k3s start
In meta-data I put just a hostname:
hostname: node-0
Kubernetes ( K3s )
In this section I would just describe how I made MVP k8s cluster.
K3s is a single binary, all-in-one tiny kubernetes implementation. It is simple to setup
and run kubernetes with it. When installed you could just run it with command
k3s server. But to join other nodes to cluster it is required to have preshared token.
In my case I've put token into a k3s configuration file: /etc/rancher/k3s/config.yaml
there is only one line with a token:
token: "myhelloworldtoken"
So now when server (master) node started. If you run k3s agent with the same
configuration file with a same token on other node, it would join the cluster.
Of course it is just test setup, and for a production-ready you have to add and tweak more configuration parameters.
Conclusion
So far I've have explored and conigured setup to boot nodes
of my cluster over the network and configure them
individually using tiny-cloud. This setup makes the base
for a future Kubernetes cluster (I hope).
Next Steps:
- Automate Node Configuration: implement a web service to dynamically configure nodes via single configuration file, instead of bunch of separate folders with individual configs
- run an actual workload on this k8s cluster
- make cluster persistent, so it would not totally erased by reboot master node